Windows
Installation notes
If you have already installed Git, LaTeX, or any of the R packages, you should be OK. However, if you have difficulty with Homework or Labs, we may ask you to uninstall and try again.
In order to be able to support you effectively and minimize setup issues and software conflicts, we suggest you install the required software as specified below.
In all the sections below, if you are presented with the choice to download either a 64-bit (also called x64) or a 32-bit (also called x86) version of the application always choose the 64-bit version.
Terminal
By “Terminal” below we mean the command line program called “Terminal”. Note that this is also available Inside RStudio. Either works.
GitHub
In Stat 406 we will use the publicly available GitHub.com. If you do not already have an account, please sign up for one at GitHub.com
Sign up for a free account at GitHub.com if you don’t have one already.
Git, Bash, and Windows Terminal
Although these three are separate programs, we are including them in the same section here since they are packaged together in the same installer on Windows. Briefly, we will be using the Bash shell to interact with our computers via a command line interface, Git to keep a version history of our files and upload to/download from to GitHub, and Windows Terminal to run the both Bash and Git.
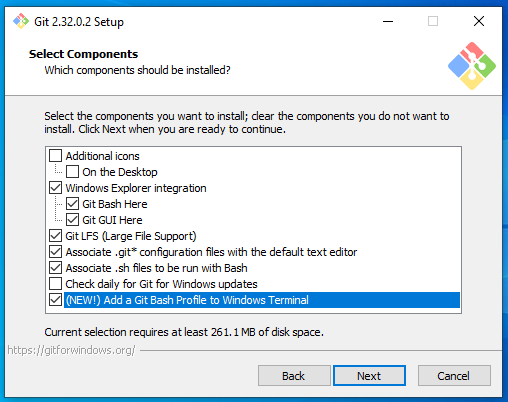
Go to https://git-scm.com/download/win and download the windows version of git. After the download has finished, run the installer and accept the default configuration for all pages except for the following:
On the Select Components page, add a Git Bash profile to Windows Terminal.
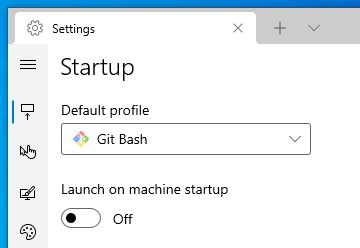
To install windows terminal visit this link and click Get to open it in Windows Store. Inside the Store, click Get again and then click Install. After installation, click Launch to start Windows Terminal. In the top of the window, you will see the tab bar with one open tab, a plus sign, and a down arrow. Click the down arrow and select Settings (or type the shortcut Ctrl + ,). In the Startup section, click the dropdown menu under Default profile and select Git Bash.
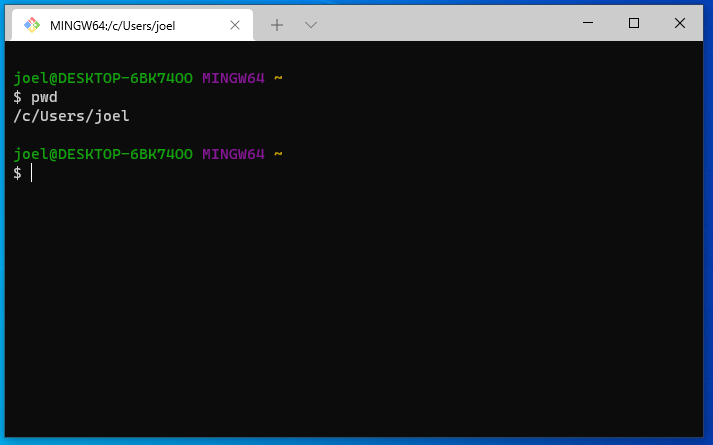
You can now launch the Windows terminal from the start menu or pin it to the taskbar like any other program (you can read the rest of the article linked above for additional tips if you wish). To make sure everything worked, close down Windows Terminal, and open it again. Git Bash should open by default, the text should be green and purple, and the tab should read MINGW64:/c/Users/$USERNAME (you should also see /c/Users/$USERNAME if you type pwd into the terminal). This screenshot shows what it should look like:
Whenever we refer to “the terminal” in these installation instructions, we want you to use the Windows Terminal that you just installed with the Git Bash profile. Do not use Windows PowerShell, CMD, or anything else unless explicitly instructed to do so.
To open a new tab you can click the plus sign or use Ctrl + Shift + t (you can close a tab with Ctrl + Shift + w). To copy text from the terminal, you can highlight it with the mouse and then click Ctrl + Shift + c. To paste text you use Ctrl + Shift + v, try it by pasting the following into the terminal to check which version of Bash you just installed:
bash --versionThe output should look similar to this:
GNU bash, version 4.4.23(1)-release (x86_64-pc-sys)
Copyright (C) 2019 Free Software Foundation, Inc.
License GPLv3+: GNU GPL version 3 or later <http://gnu.org/licenses/gpl.html>
This is free software; you are free to change and redistribute it.
There is NO WARRANTY, to the extent permitted by law.If there is a newline (the enter character) in the clipboard when you are pasting into the terminal, you will be asked if you are sure you want to paste since this newline will act as if you pressed enter and run the command. As a guideline you can press Paste anyway unless you are sure you don’t want this to happen.
Let’s also check which version of git was installed:
git --versiongit version 2.32.0.windows.2Some of the Git commands we will use are only available since Git 2.23, so make sure your if your Git is at least this version.
Configuring Git user info
Next, we need to configure Git by telling it your name and email. To do this, type the following into the terminal (replacing Jane Doe and janedoe@example.com, with your name and email that you used to sign up for GitHub, respectively):
git config --global user.name "Jane Doe"
git config --global user.email janedoe@example.comTo ensure that you haven’t made a typo in any of the above, you can view your global Git configurations by either opening the configuration file in a text editor (e.g. via the command nano ~/.gitconfig) or by typing git config --list --global).
If you have never used Git before, we recommend also setting the default editor:
git config --global core.editor nanoIf you prefer VScode (and know how to set it up) or something else, feel free.
R and RStudio
R is the only language that we will be using in this course. We will generally (always?) use R in RStudio.
R
Go to https://cran.r-project.org/bin/windows/base/ and download the latest version of R for Windows. Open the file and follow the installer instructions accepting the default configuration.
Although it is possible to install R through conda, we highly recommend not doing so. In case you have already installed R using conda you can remove it by executing conda uninstall r-base.
This course requires R version 4.2 or higher. You may need to update.
The course package will error on install if this is not the case.
RStudio
Download the Windows version of RStudio Desktop from https://posit.co/download/rstudio-desktop/. Open the file and follow the installer instructions.
To see if you were successful, try opening RStudio by clicking on its icon.
Rtools
Windows users will also need to install Rtools, which will allow you to use external libraries. Go to http://cran.r-project.org/bin/windows/Rtools/ and download the latest version (e.g., rtools40v2-x86_64.exe). After the download has finished, run the installer with the default configuration.
Do not follow the Rtools’ website instructions for “Putting Rtools on the PATH”. RStudio will put Rtools on the PATH automatically when it is needed.
To test if your installation was successful, open RStudio (restart it if you already have it open) and type the following into the Console:
install.packages("jsonlite", type = "source")If the jsonlite package installs without errors, Rtools is setup correctly.
Installing R packages
Next, install the key R packages needed for the course by opening up RStudio and typing the following into the R console inside RStudio:
install.packages("remotes")
remotes::install_github("ubc-stat/stat-406-rpackage", dependencies = TRUE)
With luck, that will install everything you need.
LaTeX
It is possible you already have this installed.
First try the following check in RStudio
Stat406::test_latex_installation()If you see Green checkmarks, then you’re good.
Even if it fails, follow the instructions, and try it again.
Note that you might see two error messages regarding lua during the installation, you can safely ignore these, the installation will complete successfully after clicking “OK”.
If it still fails, proceed with the instructions
In RStudio, run the following commands to install the tinytex package and setup tinytex:
install.packages('tinytex')
tinytex::install_tinytex()
In order for Git Bash to be able to find the location of TinyTex, you will need to sign out of Windows and back in again. After doing that, you can check that the installation worked by opening a terminal and asking for the version of latex:
latex --versionYou should see something like this if you were successful:
pdfTeX 3.141592653-2.6-1.40.23 (TeX Live 2021/W32TeX)
kpathsea version 6.3.3
Copyright 2021 Han The Thanh (pdfTeX) et al.
There is NO warranty.  Redistribution of this software is
covered by the terms of both the pdfTeX copyright and
the Lesser GNU General Public License.
For more information about these matters, see the file
named COPYING and the pdfTeX source.
Primary author of pdfTeX: Han The Thanh (pdfTeX) et al.
Compiled with libpng 1.6.37; using libpng 1.6.37
Compiled with zlib 1.2.11; using zlib 1.2.11
Compiled with xpdf version 4.03
Github PAT
You’re probably familiar with 2-factor authentication for your UBC account or other accounts which is a very secure way to protect sensitive information (in case your password gets exposed). Github uses a Personal Access Token (PAT) for the Command Line Interface (CLI) and RStudio. This is different from the password you use to log in with a web browser. You will have to create one. There are some nice R functions that will help you along, and I find that easiest.
Complete instructions are in Chapter 9 of Happy Git With R. Here’s the quick version (you need the usethis and gitcreds libraries, which you can install with install.packages(c("usethis", "gitcreds"))):
- In the RStudio Console, call
usethis::create_github_token()This should open a webbrowser. In the Note field, write what you like, perhaps “Stat 406 token”. Then update the Expiration to any date after December 15. (“No expiration” is fine, though not very secure). Make sure that everything inrepois checked. Leave all other checks as is. Scroll to the bottom and click the green “Generate Token” button. - This should now give you a long string to Copy. It often looks like
ghp_0asfjhlasdfhlkasjdfhlksajdhf9234u. Copy that. (You would use this instead of the browser password in RStudio when it asks for a password). - To store the PAT permanently in
R(so you’ll never have to do this again, hopefully) callgitcreds::gitcreds_set()and paste the thing you copied there.
Post-installation notes
You have completed the installation instructions, well done 🙌!
Attributions
The DSCI 310 Teaching Team, notably, Anmol Jawandha, Tomas Beuzen, Rodolfo Lourenzutti, Joel Ostblom, Arman Seyed-Ahmadi, Florencia D’Andrea, and Tiffany Timbers.