Lecture 3: Version Control
STAT 545 - Fall 2026
From this week’s topic, students are anticipated to be able to:
create an R Project,
use git on their own computer (locally),
connect between a local git repository and that repository on GitHub, using RStudio,
make commits in git using RStudio,
make a branch in git using RStudio or GitHub, and
use collaborative GitHub features such as Issues and pull requests.
After this class, you should be able to start working on your Collaborative Project.
Please Enter Your GH Username!
Important
🚨 I need your GitHub username to add you to our STAT545 GitHub organization! 🚨
PLEASE INPUT YOUR GITHUB USERNAME INTO THIS CANVAS ASSIGNMENT BOX NOW
Thanks 😊
What is Git and GitHub?
Get Acquainted with Git and GitHub
“Git” is a version control system designed to track changes.
Git essentially creates “snapshots” of your work as you progress through a project.
This is what GitHub uses!
Repositories, Organizations, and Personal Accounts
A repository stores files and the history of the files; the usual convention is to use a single repository to organize a single project.
GitHub is a place where repositories can live online. Being online provides us a way to share and collaborate on projects. It also serves as a backup for your project.
Example 1: Grace’s GitHub page
Example 2: The STAT 545 GitHub page
The first repository lives under Grace’s personal Github account. The second repository lives under the UBC-STAT organization. Organizations are useful if you have lots of different projects with a common theme which lots of people are collaborating on.
Git States and Lingo
We can interact with and send data between GitHub and RStudio using Git.
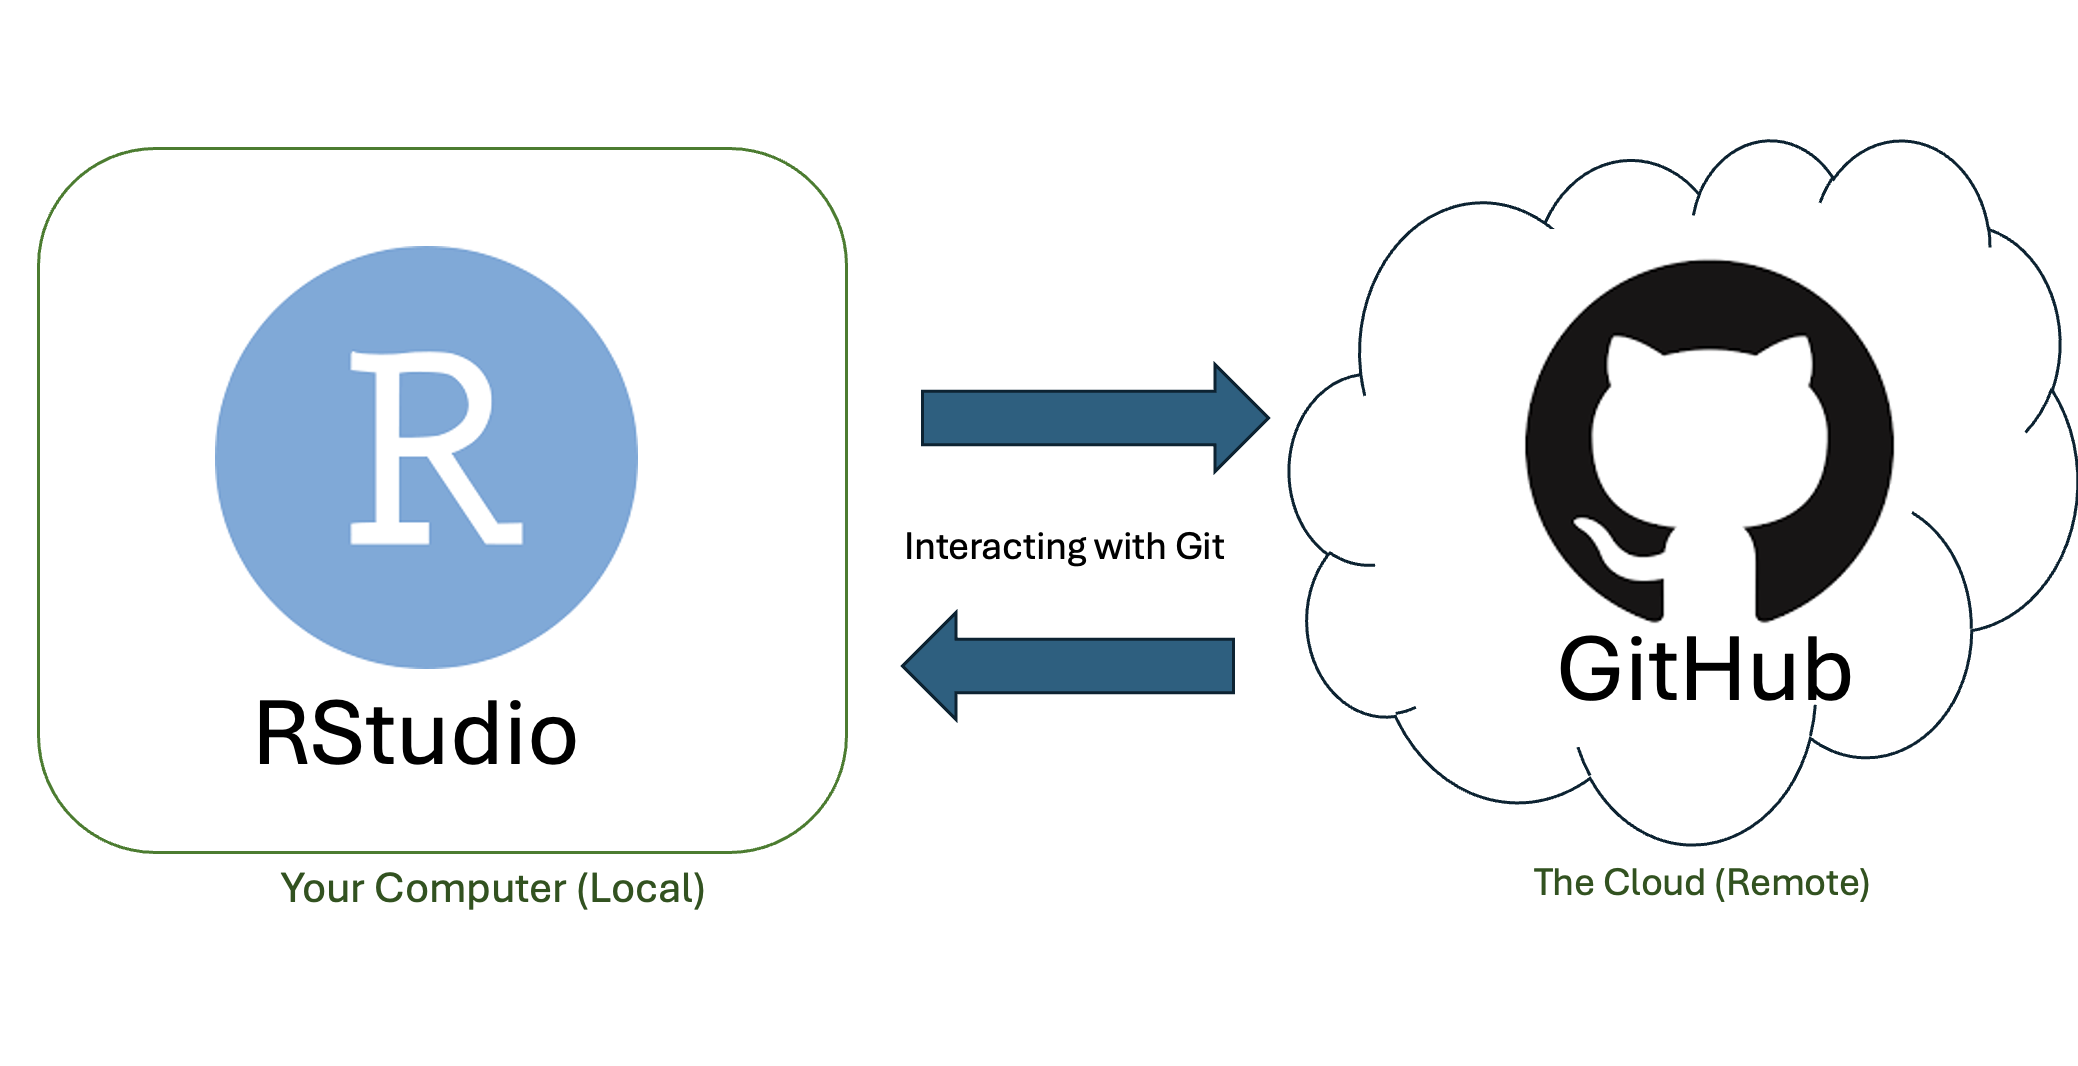
Git States and Lingo
To use Git, we should first understand the primary states that files can be in. These are:
- Modified: you’ve changed something in the files, but Git hasn’t accounted for them yet.
- Staged: Git has tracked the changes you’ve made, but they haven’t been accounted for in the latest snapshot of your work.
- Committed: the changes you’ve made have been stored and updated as the latest snapshot of your project.
Git States and Lingo
After changes are committed locally (on your computer), we can push them to a GitHub repository.
This sends the changes and updates the most recent version of your project on GitHub.
We can also pull changes from GitHub to your local machine. This is useful when multiple people (or perhaps one person on multiple devices) are working on a project.
Git States and Lingo
Other useful Git features include:
- Cloning a repository: copying an existing GitHub repository to your local machine. You can push and pull changes after cloning.
- Using Branches: creating a separate line of development within your repository, allowing for isolated work on new features. This is a safe way to ensure you aren’t overwriting the main repository branch. Branches can be merged together later in development
- Pull Requests: Git’s way of proposing changes to the repository’s main branch.
Syncing RStudio and GitHub
We will demonstrate how Git and GitHub can be used within an R Project.
R Projects are useful for organizing files and resources specific to a project in a self-contained directory.
R Projects allow for more reproducible workflows, and allow users to resume exactly where they left off within a project by keeping variables in the environment even after the session has closed.
There are really two (okay, more than that but we’ll focus on two here) ways that you can connect RStudio and Github. You can:
Create a GitHub repository, and then sync that to an R Project in RStudio, OR
Create an R Project in RStudio, and then sync it to GitHub.
I will show you both ways.
Side note here: the newer version of RStudio (called Positron) does not use R Projects. Instead, you can create a “folder”. All other steps will be pretty much the same!
Syncing GitHub and RStudio: “GitHub First”
Syncing: “GITHUB FIRST”
Step 1: Create a GitHub Repository
1.1: Go to your GitHub profile (mine is at https://github.com/grcetmpk)
1.2: Create a new GitHub repository by clicking the + symbol in the top bar and using the dropdown menu to create a new repository.
1.3: Name your repository “demo-github-first-[initials]”. In the description write “STAT 545 Demo”. Check the box for adding a README file.
You are now redirected to the repository main page. The repository page tells you you have 1 commit.
Click on it to get to the history page. This tells you all the changes that have been tracked for the files in the repository so far.
Syncing: “GITHUB FIRST”
1.4: Go back to your repository main page. Click on README.md, then click the pencil icon (“Edit this file”). Add the following information into the README.md file:
Your Name
Your Program
1.5: Commit your changes by clicking the commit changes button, and briefly summarize the changes you’ve made in the Commit message.
Now, look at the GitHub commit history again. Has anything changed?
Syncing: “GITHUB FIRST”
Step 2: Clone the Repository
Now it’s time to turn the repository into an RProject. We do this by cloning.
2.1: In RStudio, go to “File > New Project”
2.2: Click on “Version Control: Checkout a project from a version control repository”
2.3: Click on “Git: Clone a project from a repository”
Syncing: “GITHUB FIRST”
- 2.4: Fill in the info: URL: use HTTPS address (found on GitHub when clicking the green “Code” button) Create as a subdirectory of: Browse to where you would like to save this repository on your machine (creates a new folder in the location you select)
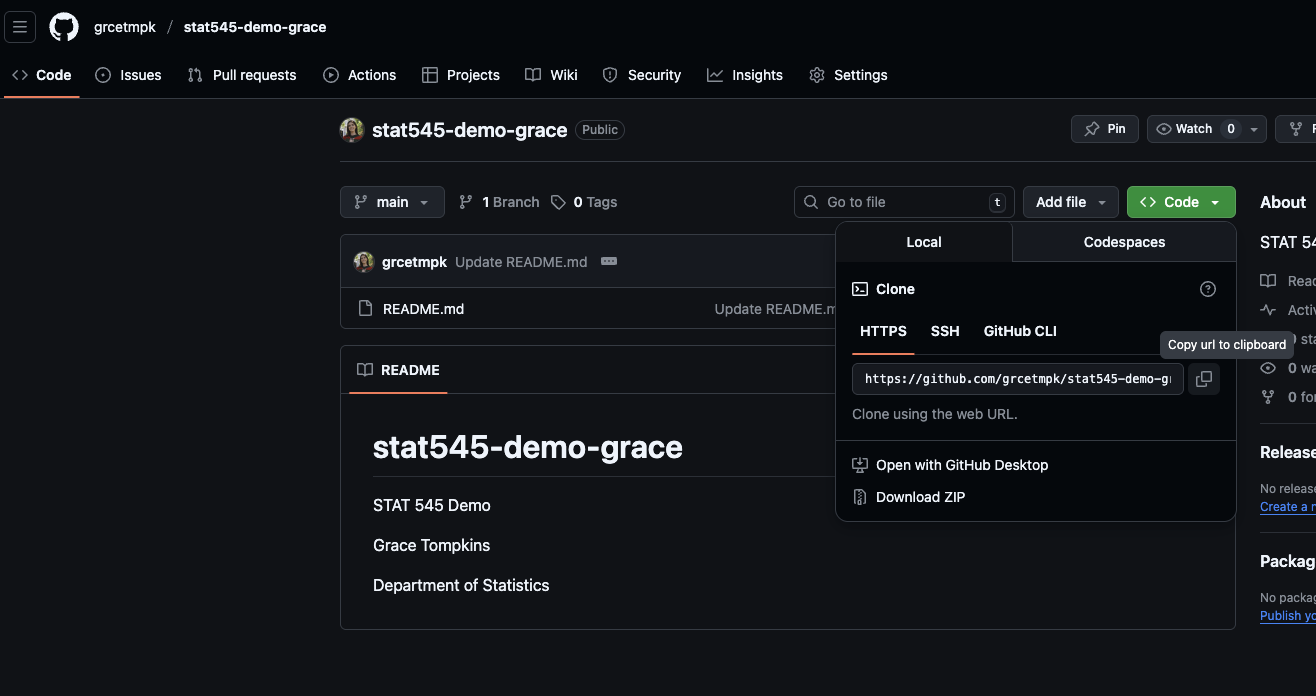
Syncing: “GITHUB FIRST”
Now you have a local version of this project! And can make changes on both RStudio or GitHub, which is described in the “Syncing Your Changes” section below.
Side note:
- you can clone any public project, however you need to be added as a collaborator to push those changes to GitHub.
- If you’d like to play around with existing repositories, you could “Fork” it. A fork is a copy of a repository. Forking a repository allows you to freely experiment with changes without affecting the original project. More info here: https://docs.github.com/en/pull-requests/collaborating-with-pull-requests/working-with-forks/fork-a-repo.*
Syncing GitHub and RStudio: “RStudio First”
Syncing: “RSTUDIO FIRST”
Step 1: Create a new R Project
1.1: Open RStudio.
1.2: Go to “File” > “New R Project…”.
1.3: Select “New Directory”, “New Project”, and name it “demo-rstudio-first-[initials]”.
- Select “Browse” and find a location where you’d like to save your project (a new folder the same name as your project will be created).
- I chose the Desktop as an example. Ensure “Create a Git Repository” is selected. Click “Create Project”.
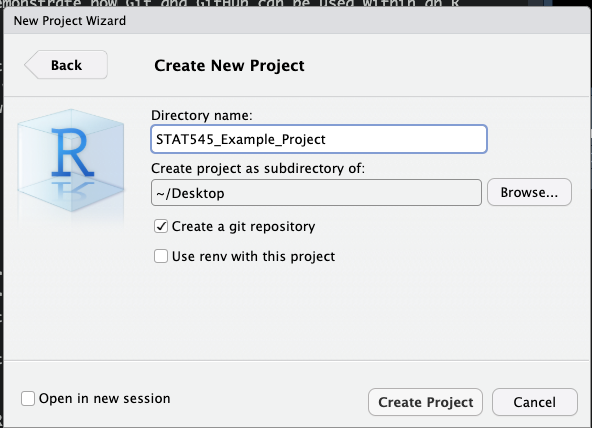
Syncing: “RSTUDIO FIRST”
RStudio will refresh. You will now see at the top of RStudio that the name of your project is displayed.
RStudio doesn’t automatically create a README, but we can add one quickly.
- 1.4: Go to File > New File > Markdown. Add some random markdown (text) to the document (maybe your name). Save the file exactly as “README.md”.
Syncing: “RSTUDIO FIRST”
Step 2: Create a GitHub Repository
2.1: In the R Console, load in the
usethispackage by callinglibrary(usethis)- Getting an error? run
install.packages("usethis")first)
- Getting an error? run
2.2: In the R Console, run
use_git().- When asked if it’s okay to commit some changes, select an option that means yes (it could be “OK” or “For sure” or “Yes”, for example) by writing the number in the console and hitting Enter. If it prompts you to restart RStudio, you can do so.
2.3: If you restarted RStudio, call
library(usethis)again. Then, in the Console calluse_github(). A new repository on your GitHub account should be created! You should see your fileREADME.mdas one of the items in your repository.
If you have issues, see the last section of Lecture 1A: Installation to set up your GitHub credentials on RStudio.
Syncing Your Changes Between RStudioand GitHub
Syncing Your Changes
At this point, regardless of whether you started with RStudio or GitHub, the steps are the same.
One way or another, you have a GitHub repository connected to RStudio.
Now…. what happens when we edit our project on our computer? Or on GitHub? Well, we need to sync those changes, and spoiler alert: it’s not automatic.
If we made a change on RStudio, we need to PUSH it to GitHub.
If we made a change on GitHub, we need to PULL it to RStudio.
Syncing Your Changes
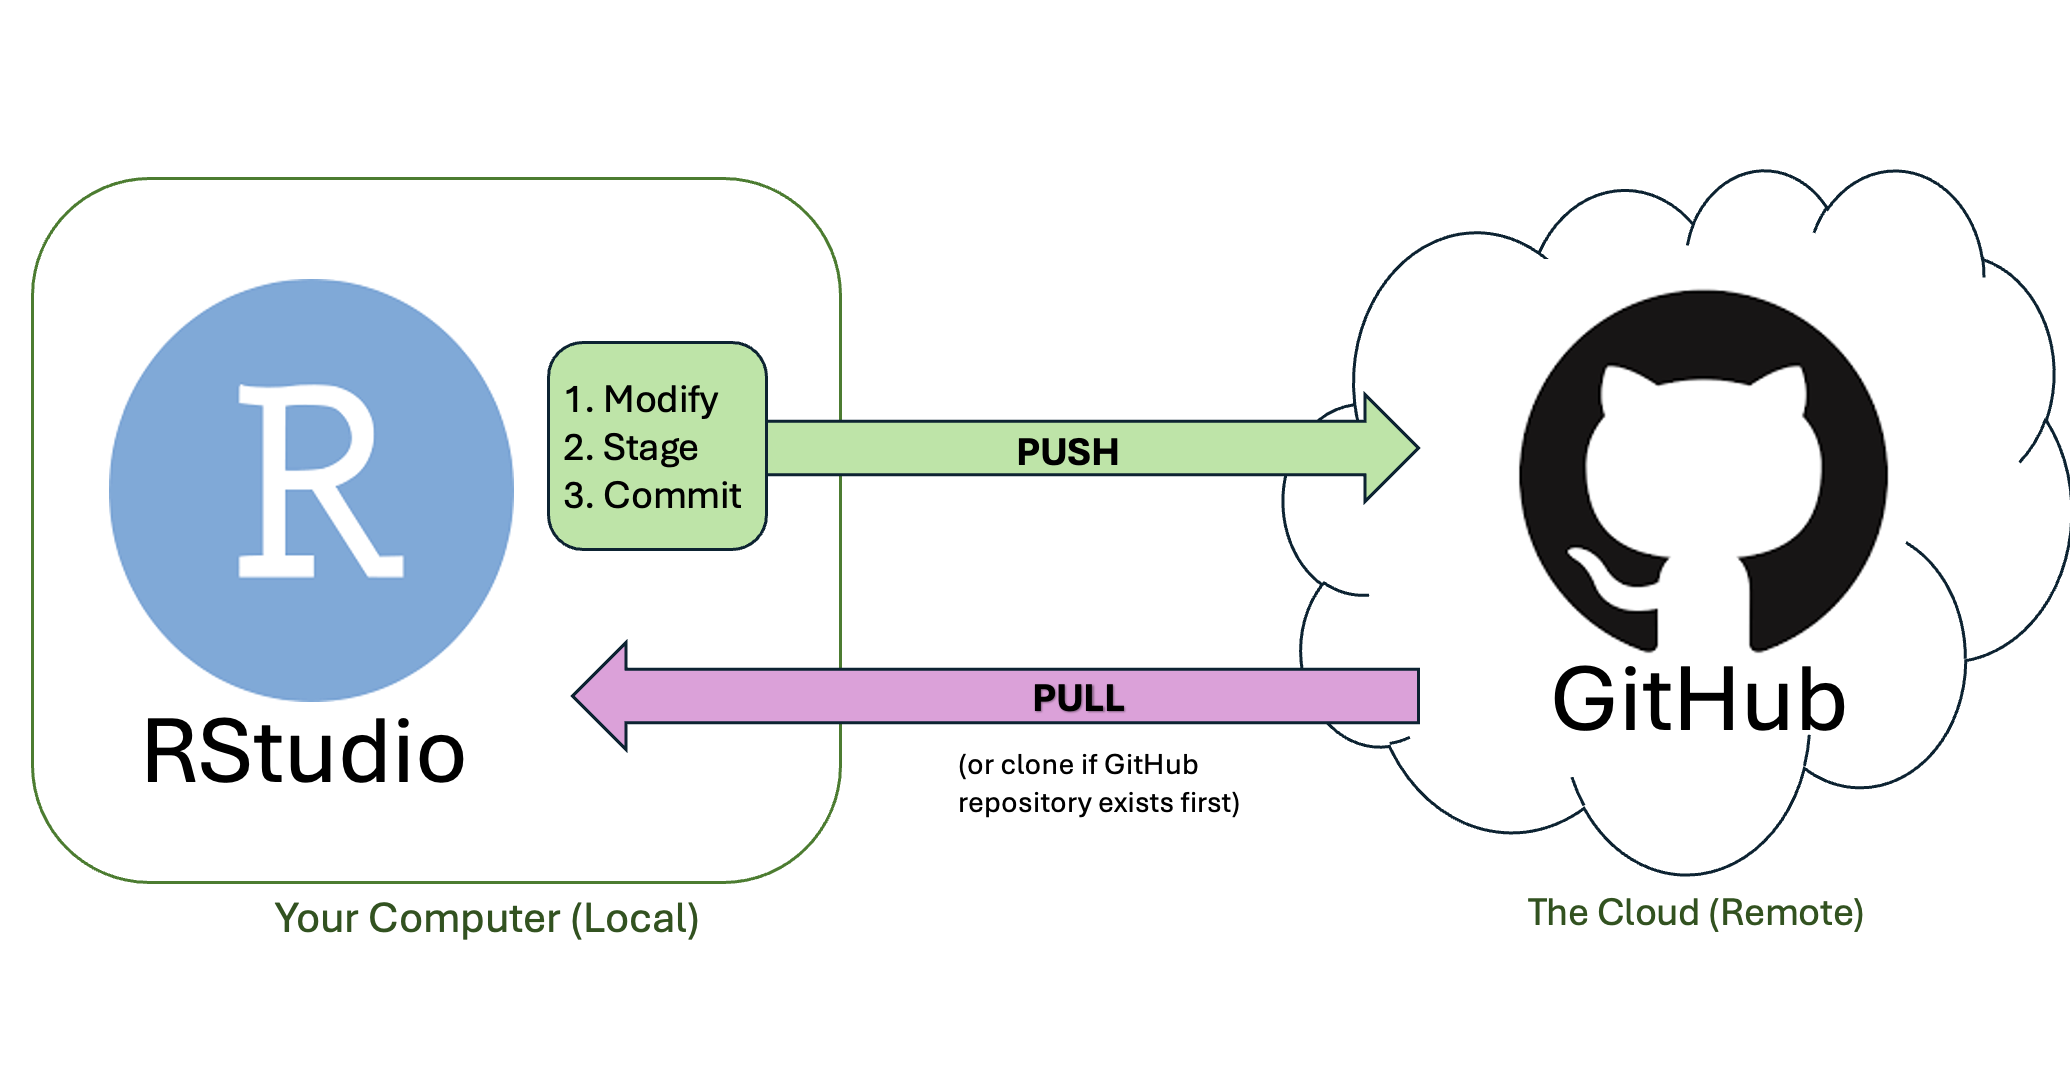
PUSHING
Let’s make some changes to one of our example projects! Let’s add a new R Script to your R Project
go to “File” > “New File” > “R Script”.
Write some code:
# view the first few rows of mtcars dataset
head(mtcars)

# calculate the average mpg among all cars, save it as a variable
mean_mpg <- mean(mtcars$mpg)

# print the mean mpg
mean_mpg
PUSHING
- Save your changes. “File” > “Save as” and name your file
analysis.R, and make usre it’s saved in your project folder!
Note: After running this code, you’ll notice mean_mpg is in your environment. The cool thing about R Projects is that the next time you open your project, you’ll continue exactly where you’re left off! All variables you created will have been saved, as if you never closed R Studio.
You can add multiple files to projects, and save things like images/pdfs of plots, multiple R Scripts (code), and data sets. Really, anything that you can save in the R Project folder will be contained in the R Project.
PUSHING
Now we need to push this to GitHub.
There are two ways that I’ll show you how to interact with GitHub through RStudio.
Using RStudio’s “Git” Tab
Using the Terminal
(Secret third option: using GitHub Desktop. I won’t show this in detail but it is an option!)
PUSHING
(Option 1) From RStudio’s “Git” Tab
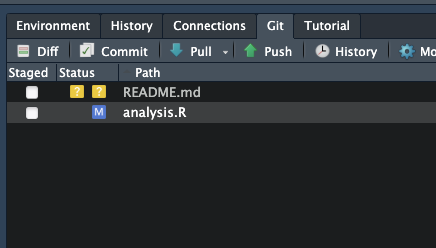
When you navigate to the “Git” tab in RStudio, you will see that README.Rmd and analysis.R are listed. This is because these files have changes! README.Rmd was added, and analysis.R was modified.
PUSHING
(Option 1) From RStudio’s “Git” Tab
We need to stage the files, commit the changes, and then push the changes to the remote GitHub version.
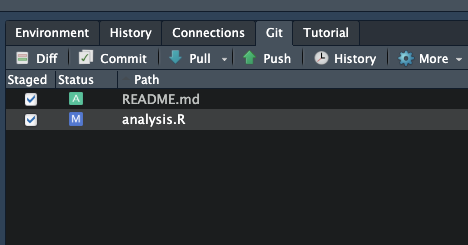
- Stage Files: Select the files you want to stage by selecting them. You will see symbols beside them - “A” stands for “Added” and “M” stands for “modified”. If you were to delete a file, you would see a red “D”.
PUSHING
(Option 1) From RStudio’s “Git” Tab
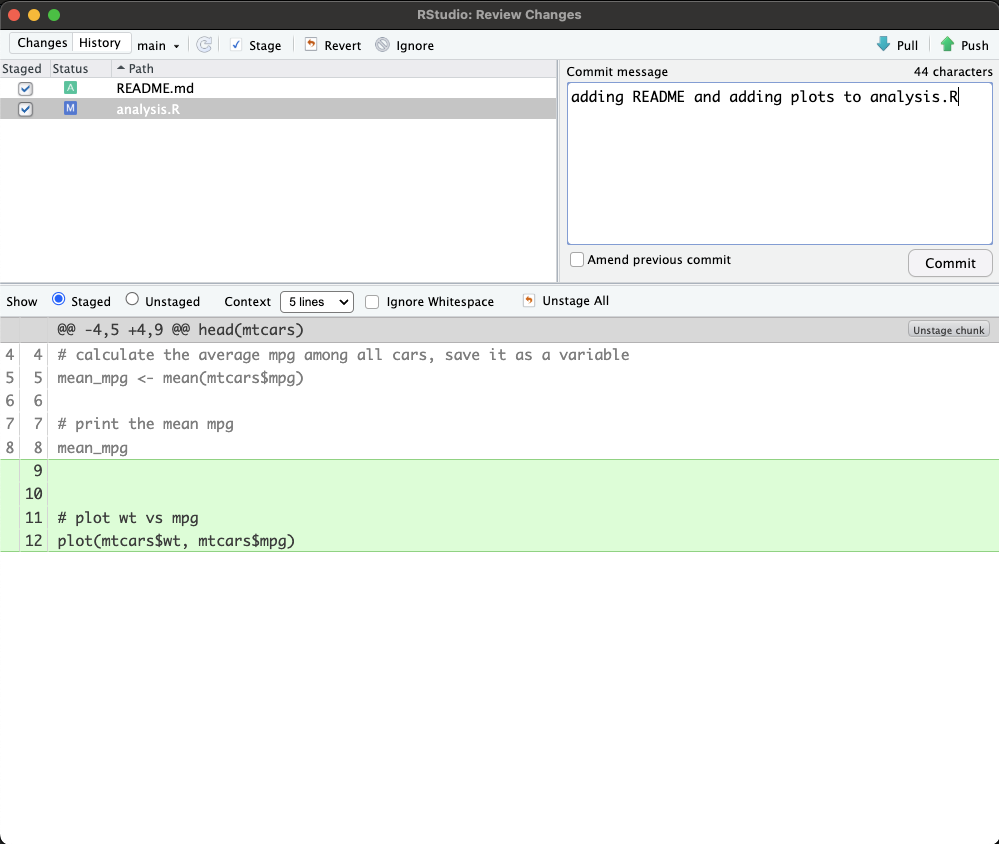
- Commit Changes: Click the Commit button. In the pop-up, you can scan through and see the changes (additions, deletions, modifications) for each file that has been staged in Step 1. Add a message explaining the changes, and click Commit. You will get a message that says 2 files have changed. Close this.
PUSHING
(Option 1) From RStudio’s “Git” Tab
Push: You now have nothing to commit, as all changes have been tracked. You will see an information message saying “Your branch is ahead of”origin/main” by 1 commit. Time to Push! Click the Push button. If successful, the following message will appear:
>>> /usr/bin/git push origin HEAD:refs/heads/main
To https://github.com/<yourGitHubusername/STAT545_Example_Project.git
  37b4ec8..7b32df4  HEAD -> main
Close this pop-up, and the “GitHub interface.”Review Changes” pop-up.
PUSHING
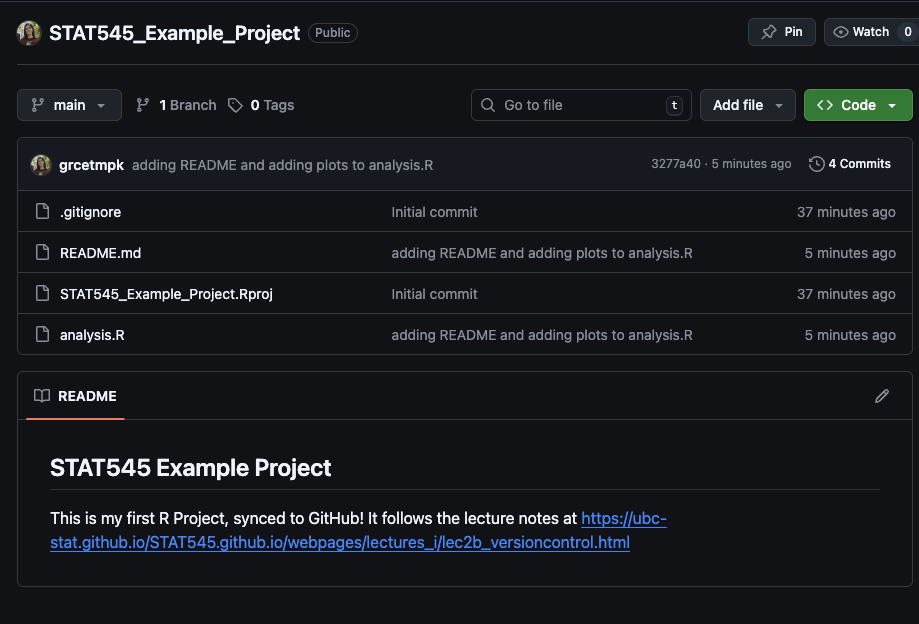
Now, when you go to your GitHub account, you should see some changes to your STAT545_Example_Project repository! You can see when the changes were pushed, and now a README appears below the files!
PUSHING
(Option 2) From RStudio’s Terminal
Instead of using the Git pane, we can write out commands for Git in the Terminal.
Stage Changes:
git add .stages all of your modified files (can also just name the files you want to commit instead of using.)Commit Changes:
git commit -m "some message"commits your changes, along with a message summarizing the changesPush Changes:
git push origin mainpushes your changes to the GitHub repo (main branch, which is typically the default)
Syncing Your Changes from GitHub (Pulling)
PULLING
Sometimes, files get edited directly on GitHub (or perhaps someone else changed some files, sent them to GitHub, and you don’t have those important changes on your computer!)
PULLING
Let’s edit the README.md file on GitHub. Click the pencil icon at the bottom of the repository where the README appears, change or add some text, and click the green “Commit Changes” button.
The changes only exist on GitHub! If you look at your README.md file on your computer or in RStudio, it is not updated.
To get changes from GitHub to RStudio, we PULL. We do this by either:
- Clicking the down arrow beside the PUSH arrow, or
- Running
git pullin the terminal
After doing either of these, your changes should appear in your project!
More on Git
Branches
Branches allow for parallel development within a repository. Branches are also a safe way to test out new features, fix bugs, or experiment with new ideas.
When creating a repository, a default branch is created. This is typically named “main” (or in older repositories, “master”).
The default branch is the branch that GitHub displays when anyone visits your repository.
The default branch is also the initial branch that Git checks out locally when someone clones the repository.
Unless you specify a different branch, the default branch in a repository is the base branch for new pull requests and code commits.
More on Git
Branches
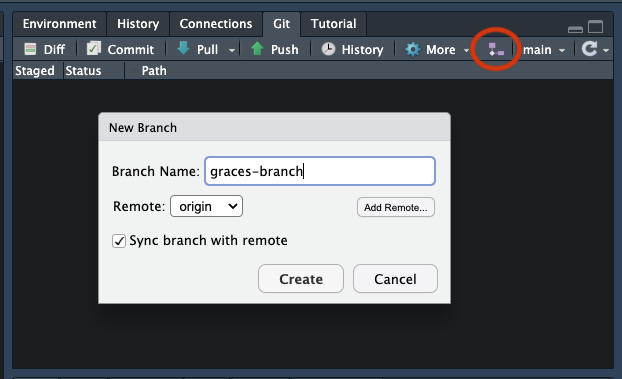
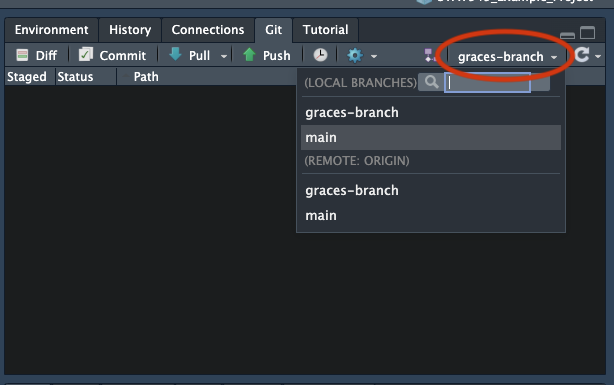
- To create a new branch, you can either navigate to the Git pane and click the icon with two purple rectangles connected to a white diamond.
- Here, you can create a new branch and name it. Then, you can switch between branches using the drop down menu beside it (see below).
More on Git
Branches
You can make changes on your new branch, and push them to that branch on GitHub.
- NOTE: if using Terminal, you can create a new branch using
git checkout -b <new-branch-name>and switch branches usinggit checkout <new-branch-name>. You can push changes to the new branch usinggit push origin <new-branch-name>, where<new-branch-name>is the name of your branch
More on Git
Branches
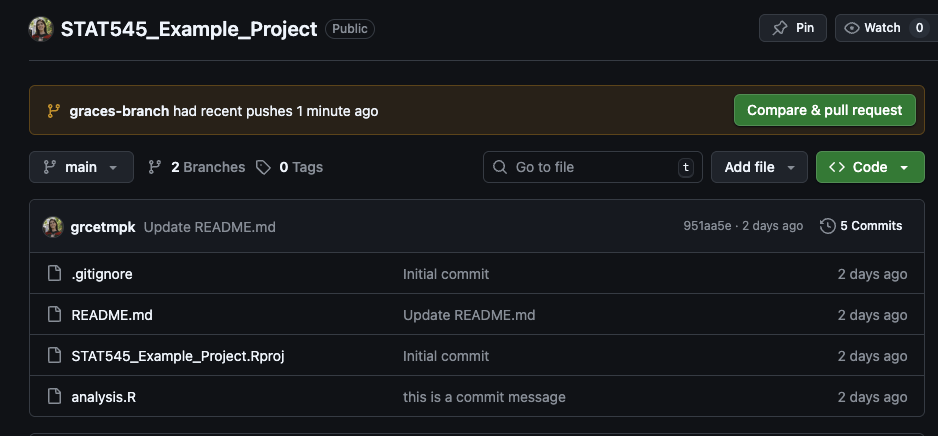
After pushing changes to a branch, you will see a message on GitHub.
More on Git
Branches
If this message does not appear, click “main” and switch the branch to the new one you just made. You will see a message that says “this branch is one commit ahead of main”. Click that message.
Click “Compare and pull request”. Here, you can see the changes between the main and new branch.
If you’re satisfied with the changes, you can click “Create pull request” to begin the merge the changes from your new branch to main.
If no conflicts exist, click “Merge pull request”. Now, the changes will be on the main (default) branch!
Click “Confirm merge”.
More on Git
Merging Conflicts
Merge conflicts happen when we’ve created multiple versions of files that can’t be obviously combined into one definitive version.
Here is an example of something that would not cause a merge conflict:
At 9am, my TA pulls from the STAT 545 repository, makes a local change to the course dashboard, and commits and pushes her changes.
At 10am, I forget to pull from the STAT 545 repository, and start working on the Day 1 notes locally.
When I commit and push, Git is a bit confused, because I wasn’t working off of the “freshest” version of the STAT 545 repository - but since my TA and I were working on different lines of code, it will fairly seamlessly figure out that the right thing to do is to add my changes to the Day 1 notes to the current version of the STAT 545 repository online.
More on Git
Merging Conflicts
Here is an example of something that WOULD cause a merge conflict:
At 9am, my TA and I both pull from the STAT 545 repository.
At 10am, my TA changes the front page to say “STAT 555 @ UBC”, and commits/pushes those changes.
At 11am, I change the front page (without pulling!!!) to say “STAT 777 @ UBC”.
When I commit and push, Git doesn’t know what to do. Should it make the version that says “STAT 555 @ UBC” or “STAT 777 @ UBC” the definitive version? The push will fail, and Git will tell us we need to fix the conflict and then commit the result.
More on Git
Merging Conflicts
How do we fix this?
Pull.
Open the file that caused the merge conflict. You should see something like this:
<<<<<<< HEAD
STAT 555 @ UBC
=======
STAT 777 @ UBC
>>>>>>> 526363991d21ed20e7e0c57b5e99d944ac5ce5aa
The stuff below the
<<<<<<<and above the=======is what was in your local version; the stuff above the>>>>>>>and below the=======is what was in the remote conflicting version. Decide what you want to have on the offending line (e.g. “STAT 555 @ UBC”), and replace the whole block of text above with that.Save and commit the file. message here might be “Fixing a merge conflict.” You should now be able to successfully push!
More on Git
Exercise
Find a partner. In this exercise, we will learn how to have different team members save their work separately on branches, and how to merge those changes to the main project branch.
Teammate A adds Teammate B to their “stat545-demo” repository as a collaborator. (Go to Settings from the main repo page, then Access > Collaborators). This should send Teammate B an email with a collaboration invitation; accept that invitation.
Teammate B clones Teammate A’s demo repository they made in class today/last class.
On their own computer, Teammate B will make a new branch in Teammate A’s demo repository. You can do this either on Github by clicking on “1 branch” on the repo homepage then the green “New branch” button, or on your own computer in R Studio with the “New Branch” button.
On their own computer, Teammate B will create a new file in the newly created branch, then commit and push it.
Teammate B will start a pull request (basically a request to merge content onto the main branch) on GitHub, by going to “Pull Requests” -> “New Pull Request”, and selecting the branch you intend to merge to the main branch. In this pull request, include a comment and title indicating (at a high level) what the change made is about.
Teammate A will follow the instructions here to merge the pull request.
More on Git
Other Tips
Commit changes OFTEN! Commit them as often as you would save your work!
Be careful when working with data containing personal identifying information (PII). This should NOT be stored on GitHub.
When you watch a Github repo, you get notifications when things happen in them. So if you “Watch” the STAT 545 webpage repo, then you will get email notifications when I update the site!
Resources
Today’s class is a digest of the following resources:
Online tutorials:
The basic version control workflow (without branching): Happy git w R: Chapter 20.
Starting with GitHub: Chapter 15: New project, GitHub first
Starting with files on your computer, and didn’t set up git: Chapter 16: Existing project, GitHub first
Starting with files on your computer, and did set up git: Chapter 17: Existing project, GitHub Last
Some additional resources that you might find useful:
- Read the Understanding the GitHub flow to get a sense of branching.